Setup New Dedicated Hetzner Server

Hetzner provides very good Dedicated and Cloud servers, from datacenters that are based in Germany and Finland, at a very competitive prices. Setting up these dedicated servers is not very difficult but still this article shows the steps involved, which can help you in case you face any issues. We have had great success in setting up our own or our client’s server environments using these dedicated servers for hosting VMs using Proxmox, for hosting Docker containers using Traefik and Portainer or for setting up SAP Servers. In addition to the dedicated servers, you can also try out their cloud servers - (Click on this link to get free €20 in Hetzner Cloud Credits on signup), which are powerful and amongst the lowest priced in the world.
Ordering the server
You can find very good deals at the Hetzner Server Auction. This article shows the steps on how to setup the Hetzner Dedicated Server that will be used to setup Proxmox VM software. Order the server from Hetzner and once you receive the details of your new server, login to the Hetzner Control panel and order an extra set of IP address which will be assigned to each of the guest VM on Proxmox.
Ordering additional IPs
Depending on your needs, you can order a single IP or a IP subnet ranging from:
subnet /29: 6 usable IPssubnet /28: 14 usable IPssubnet /27: 30 usable IPssubnet /26: 62 usable IPssubnet /25: 126 usable IPs
by going to Server -> Select you Server -> IPs -> Order additional IPs/Nets
Server details
Once you receive the email with information about additional IPs, you are ready to go. For the purposed of this article we are assuming the following:
Server Specifications:
| Device | Specs |
|---|---|
| CPU | Intel Xeon E-5-1650V3, 12 core |
| RAM | 256GB |
| HDD | 2 x 4TB |
| Network | 1 Gbit |
| RAID | Hardware - 4 port |
Network details:
Main IP Settings
- Main IP:
11.11.11.11 - Gateway:
11.11.11.1 - Netmask:
255.255.255.192
Additional IP Settings
- Subnet:
100.100.100.32/28i.e. IPs from100.100.100.33 to 100.100.100.46 - Gateway:
11.11.11.11 - Netmask:
255.255.255.240
Setup process
The Hetzner server is delivered in Rescue mode so SSH into it, using the login and password sent to you by Hetzner on email, to start the install process.

(Click on the screenshot above to see it in bigger size)
In this screenshot, it only shows a single drive. This is due to the fact that the drives are setup in RAID 0 configuration using the Adaptec RAID card. You can change the RAID setting using the information given in the Hetzner Wiki Article
In case the server does not have hardware based RAID, the drives will show up as shown below when you login:

Setup of the server is sightly different depending on whether you have single HDD or double HDD showing up.
In both cases, the process is:
- Run
installimagecommand to start the install process - Choose the linux distribution you want to install
- Edit and save the config file as per your needs
- Reboot machine
For installing Proxmox, we will be installing Debian 10+
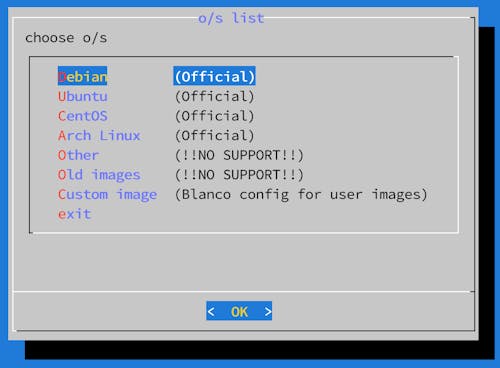
Choose Linux Distribution

Choose Debian Version

Editing config file

Config file Setting for Single Drive
Make sure to edit the config file as below (or as per your requirements) when you have a single drive:
DRIVE1 /dev/sda

HOSTNAME your.chosen.hostname

# drive partitioning
PART swap swap 4G
PART /boot ext3 512M
PART / ext4 all
Config file Setting for two or more drives
Make sure to edit the config file as below (or as per your requirements) when you have a two or more drives and you want them configured as LVM so that all the space is available for use:
# multiple drives
DRIVE1 /dev/sda
DRIVE2 /dev/sdb

#disable software RAID
SWRAID 0
SWRAIDLEVEL 1

BOOTLOADER grub

HOSTNAME your.chosen.hostname

#setup LVM
PART /boot ext3 512M
PART lvm vg0 all

LV vg0   swap   swap    swap    16G
LV vg0   root    /      ext4    all

#disable non-LVM partitions
#PART swap swap 4G
#PART /boot ext3 512M
#PART / ext4 all
Save the config file

Install Process

Adding extra drives to LVM set
Once the above setup is complete and you have rebooted into new Debian install, you will find that only the first drive is currently setup. You can follow the steps below to add all the other drives to the LVM set.
Add partition to sdb drive
- Run command
gdiskcommand to setup partitions usinggdisk /dev/sdb - Once inside
gdisk, pressoto first create a new GPT - Then press
nto create new partition. Choose defaults for most of the questions asked except at last you have to choose8e00when asked for the Hex Code or GUID - Finally enter ‘w’ to write the partition

Add drive to LVM
pvcreate /dev/sdb1

vgextend vg0 /dev/sdb1

lvextend -l +100%FREE /dev/vg0/root

resize2fs /dev/mapper/vg0-root

# check size
df -h
Screen shot

- Indivar Software Solutions Pvt Limited, India and New Zealand: Co-Founder and CTO
- Credence Medicure Corporation: Co-Founder & Director - IT
- Stakteck Limited: Co-Founder and CTO


